
Photographing an Eclipse: DIY Solar Filter
A DIY solution for mounting solar foil to your lens
I attended a course by Canon last weekend on photographing the upcoming eclipse and many of the students, and the instructor, indicated that pre-mounted solar filters were in really short supply. Several folks said that the one manufacturer was not guaranteeing delivery before the eclipse any more.
What is a photographer to do if they can’t get a filter in time? How about make your own?
Goals
Any DIY filter rig being used to photograph an eclipse must meet the following criteria:
- Must be easy to build and use (ideally just slip on and off the lens)
- Minimize camera shake as it is put in place or removed
- Stay securely on the lens when in place (we don’t want it blowing away in a breeze)
- Travel well (most of us don’t live in the path of totality)
Materials
To keep things simple, I used the side of a cardboard box for the holder, solar film (get it on Amazon) for the filter, and gaffer/masking tape to hold everything together. That’s it….
In addition, you will need a razor knife or box cutter, a straight edge for cutting, a ruler, something with a square corner (to help draw things out), and a surface safe to cut on.
Warning: if the solar foil you are using is not certified for viewing the sun through it, do not look through the viewfinder of your camera. You could cause serious damage to your eye(s) up to and including blindness. Please be safe! If you have any doubt, use your LCD screen or your phone via WiFi/Bluetooth to get the sun in your frame and focused.
Let’s Get to It
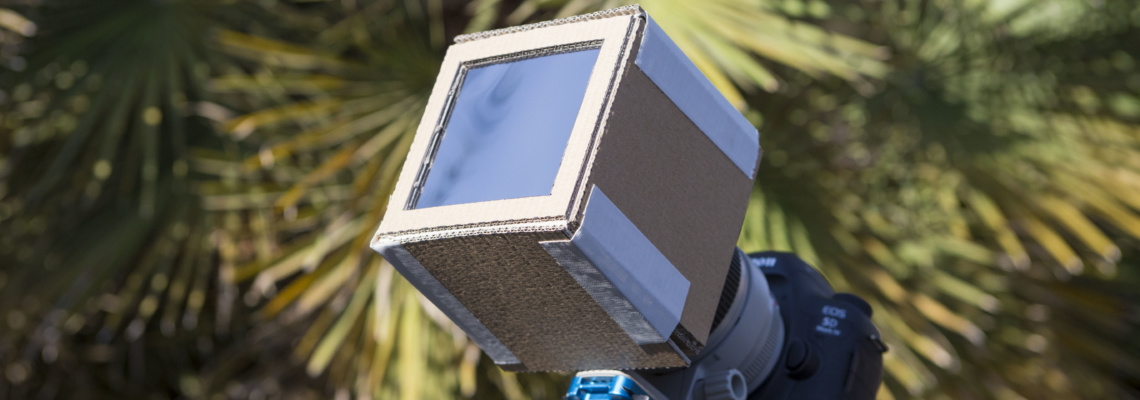
I built my holder to fit a Canon 70-200 lens. I will be using a 2x extender on this lens to get a 400mm focal length. This lens offers the challenge of the focus ring being really close to the front element. There is not much of a way to mount a non-screw in filter without obstructing the ability to manually focus. My answer to this situation: get the lens focused on the sun before the eclipse starts and tape the focus ring in place.
My plan: build a box that slips over the end of the lens hood with a hole for the solar foil to be placed. The goal is to use friction to hold this “contraption” on. To make that easier, I’m going to mount my lens hood backwards so there is a smooth surface for the filter to slide onto. Since the hood will also block access to the focus ring, this setup should also keep me from messing up the focus once it is set.
Below is a sample of the pattern I used. The solid black lines represent hard cuts and the red dotted lines are where I scored the cardboard so that it would bend easier.
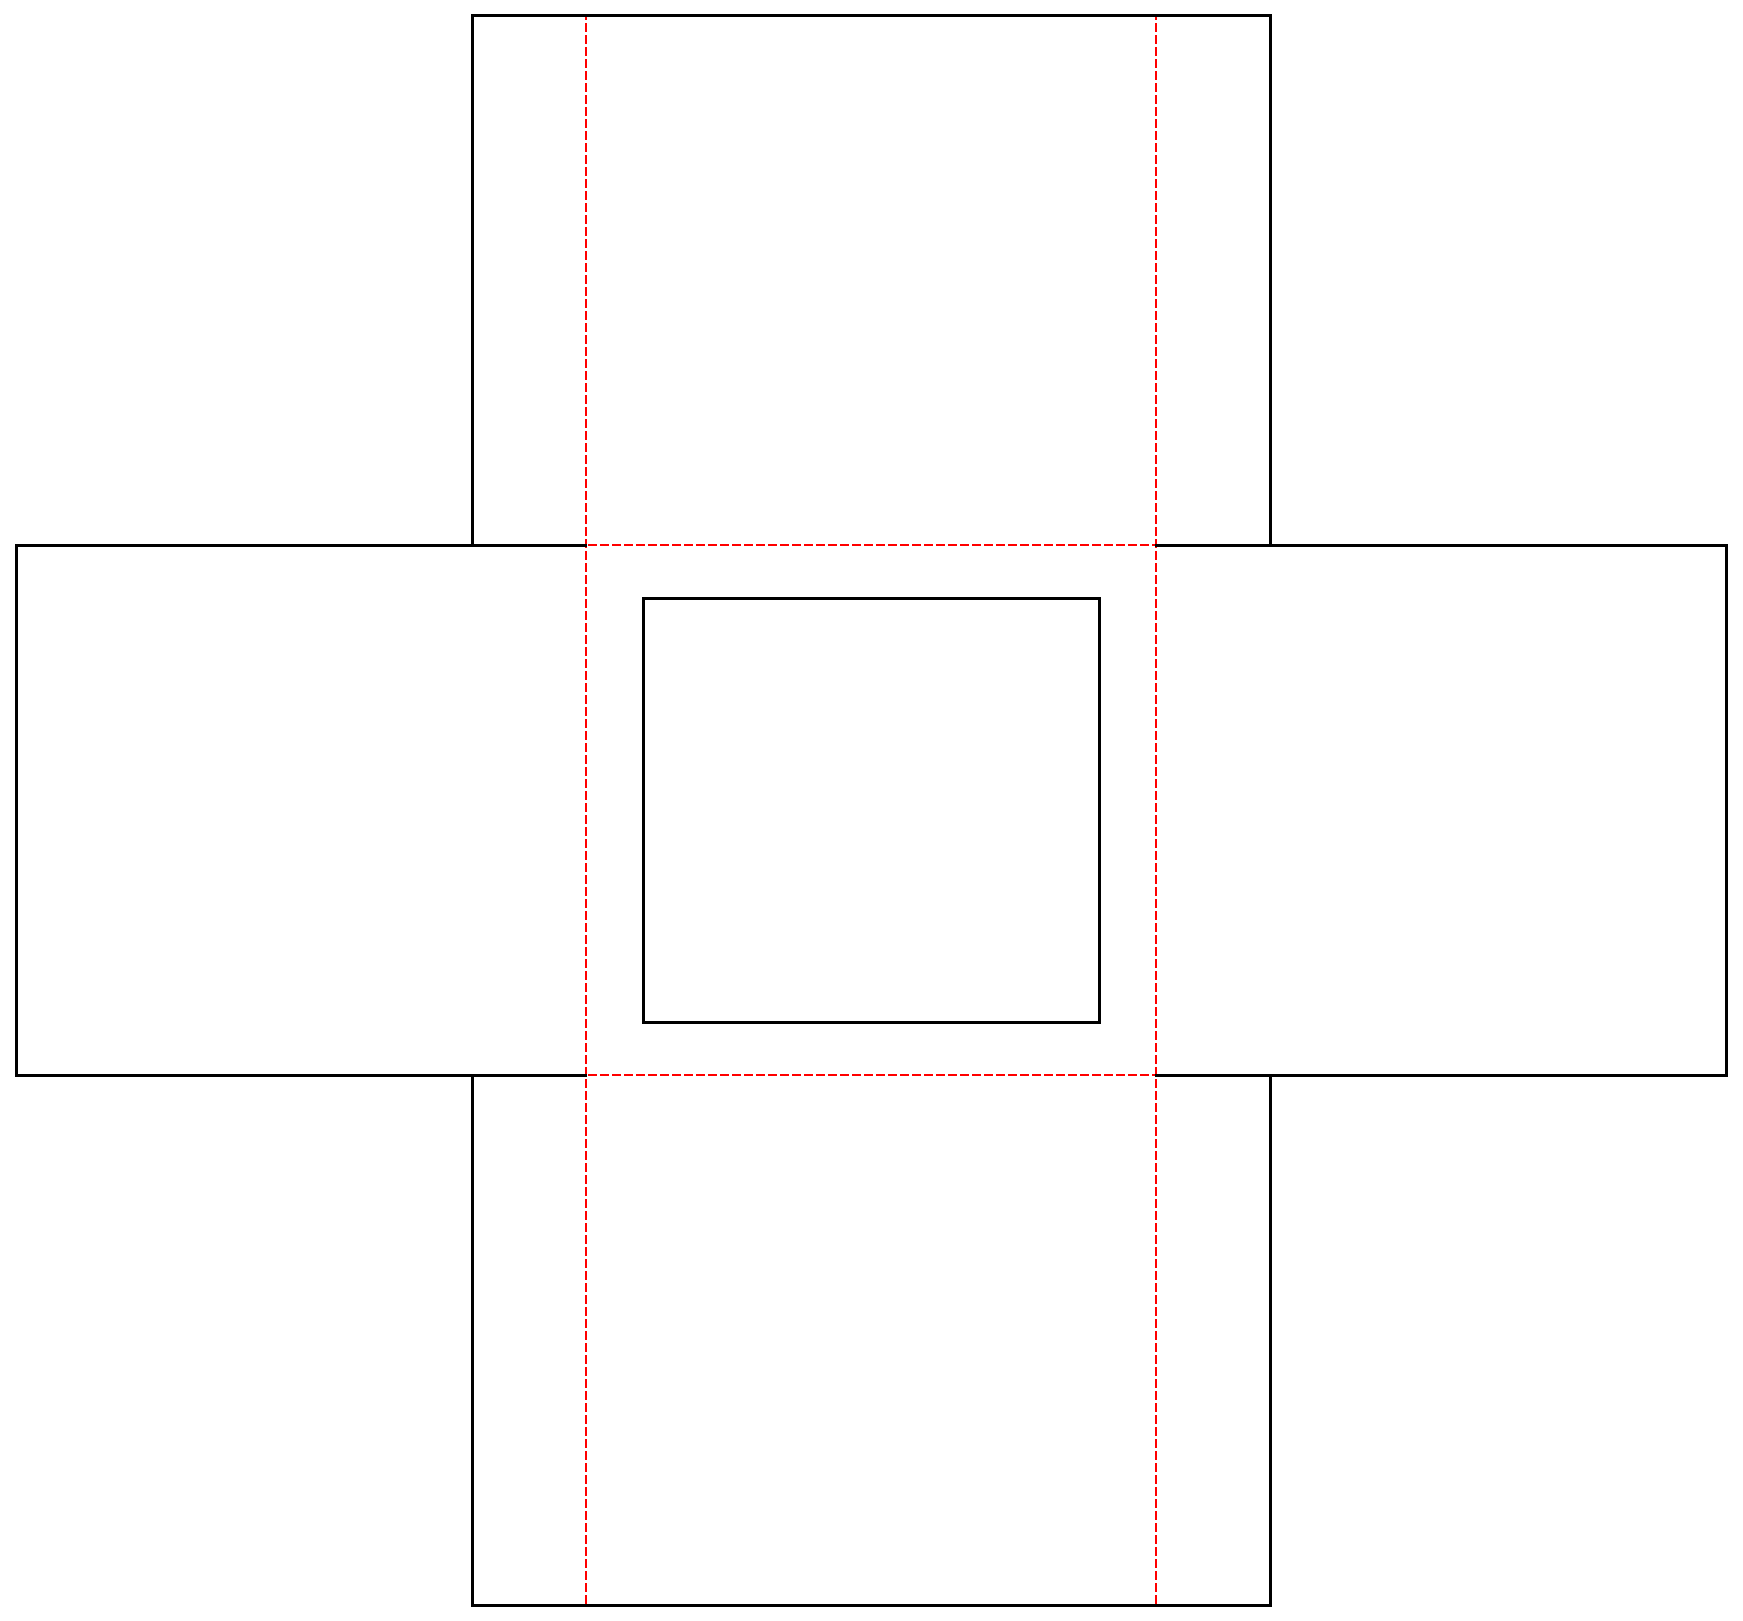
A basic example of the pattern I used to create my DIY solar filter
As part of the design I included tabs on the top and bottom flaps of the box. These are not necessary, but I found they give the design a bit more rigidity. There is no set width for these flaps – mine were about an inch wide.
The center cutout also has a bit of a lip to tape the solar foil to. Since the outside width of my lens hood is a fair amount wider than the front element of my lens, the lip shouldn’t cut off too much of my frame.
STEP 1: measure the outside of the lens hood (or the lens if you are not using a hood). Mine came to 4 and 3/8 inches. There will be the inside dimension of the squares in the pattern (except the center cutout). The center cutout should be a half inch smaller than the larger square on all sides. This gives a lip to tape the solar foil to… Given the angle of view at 400mm and the larger measurement of the lens hood, there was not reduction in the field of view.
STEP 2: get your pattern drawn out on the cardboard. The side of just about any box you have will do as long as it is fairly rigid. My wife and I just bought a new burner ring for a fire pit, so the box from that is what I am using.
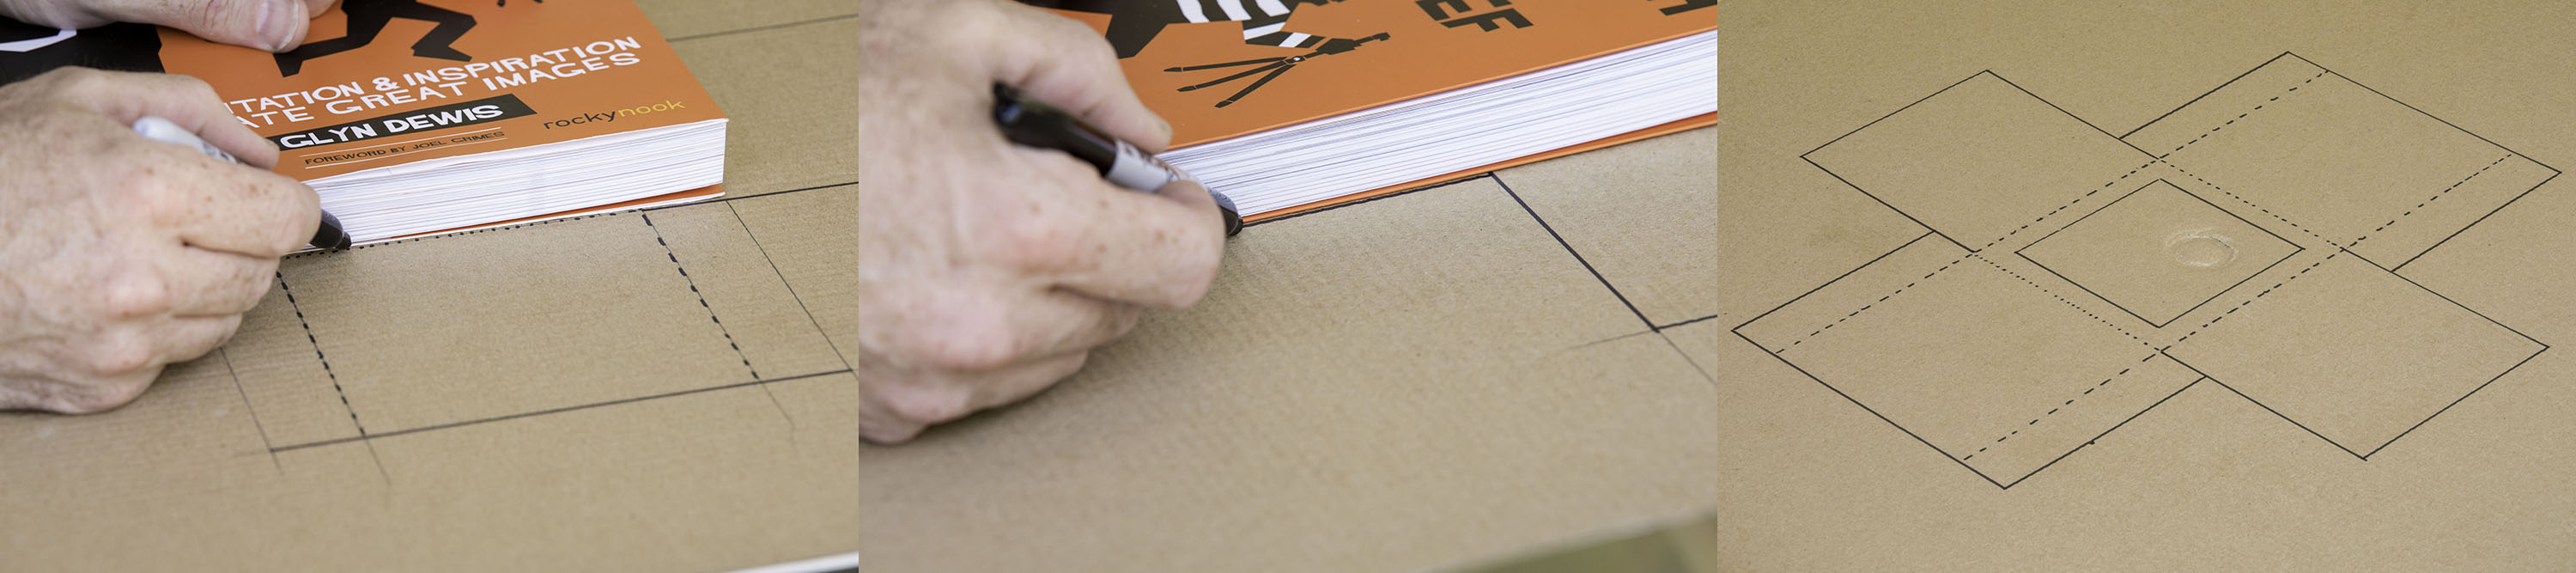
Drawing the pattern out on the side of a fire pit burner box
I am using a book to get the corners square.
STEP 3: cut it all out. I used a metal ruler as a guide while I was cutting to make life easier. I made all of the hard cuts first and followed up with the scoring.

Cutting out the filter holder and scoring along the dotted lines
STEP 4: tape the solar foil inside the cutout. I made the square of solar foil 1/2 inch smaller than the inside of the center square so there would be some place for the tape to stick to. For my filter, this measurement came to 3 7/8 inches. Mark the solar foil and cut it to size. Note: be careful with the solar foil, it attracts fingerprints and scratches easily. The less handling of it the better.
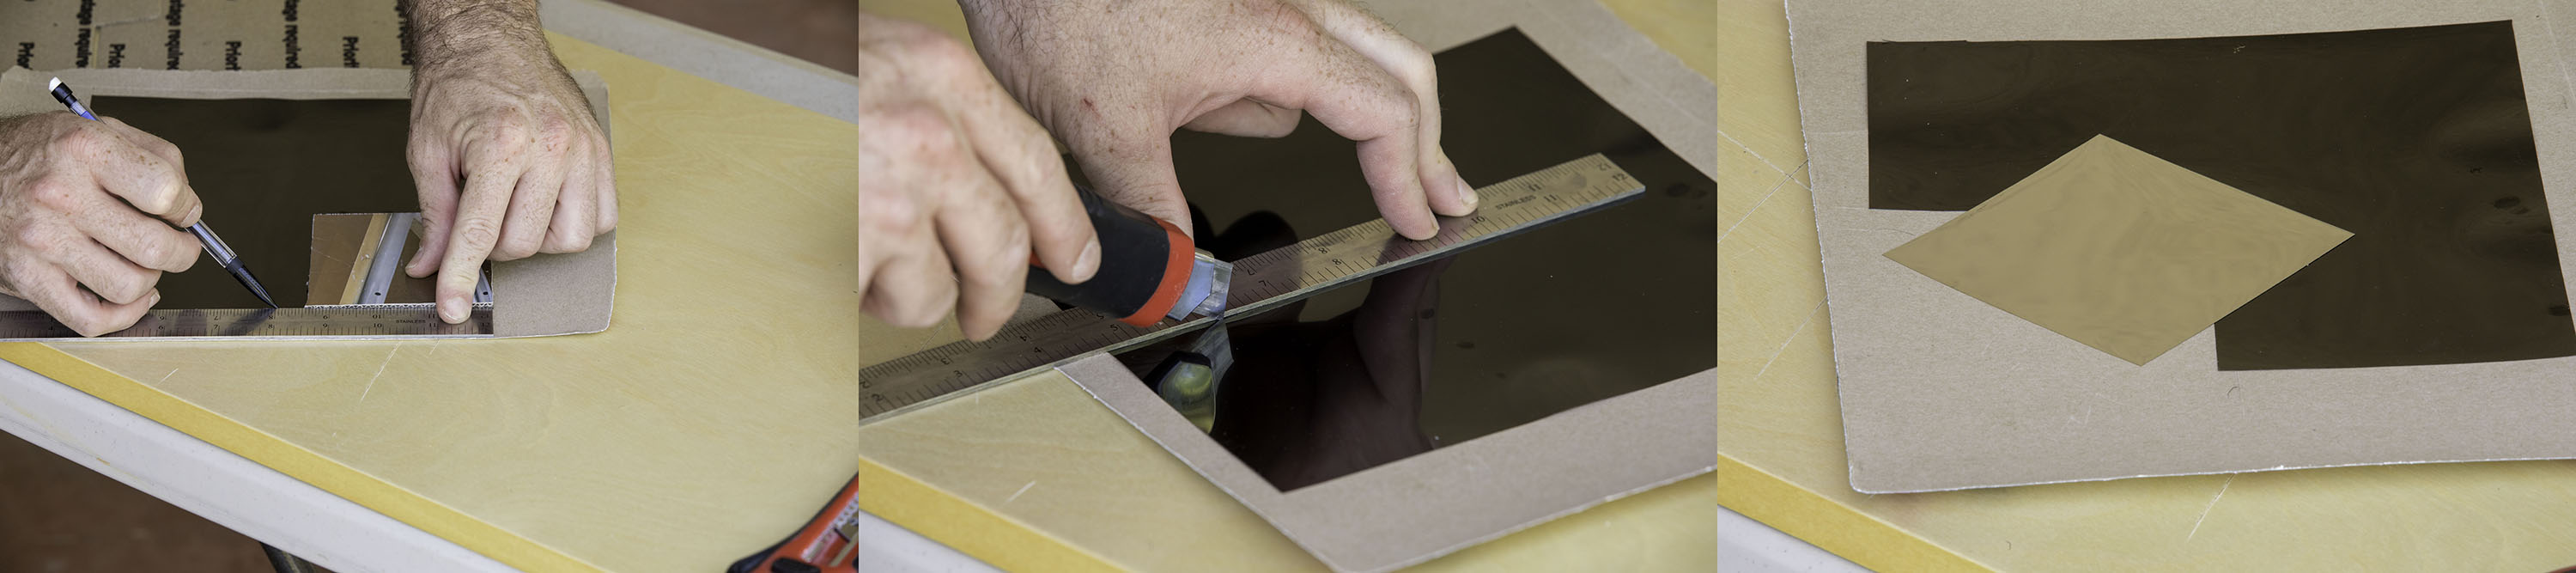
Marking and cutting the solar foil to size
STEP 5: put this sucker together. I started by pre-bending all of the scored lines to make manipulating the cardboard easier. Then I taped the solar foil in place and finished taping the sides together up. Taping the holder with the tabs on the outside of the box will result in a tighter fit. With the tabs on the inside the fit will be looser. I went the route of tabs on the inside and shimmed the inside of the box to get a snug fit. See the troubleshooting section below if the fit is not what you would like.
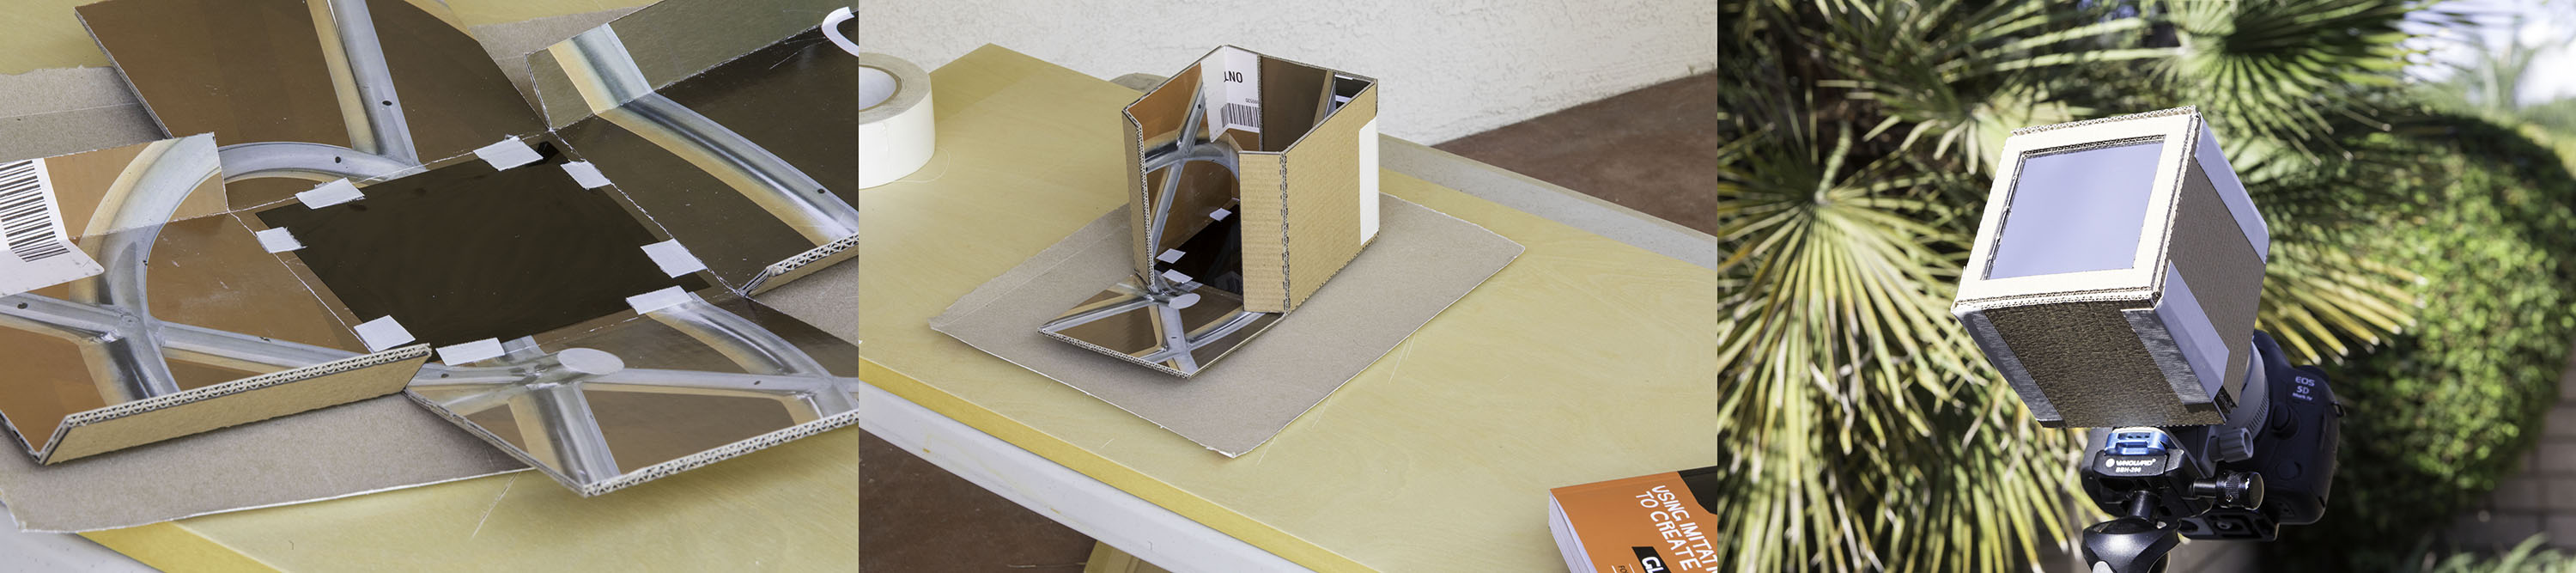
Taping the solar foil and sides in place.
That’s it! Time for a test drive… If all goes well the box should slide on the end of your lens/hood and have just enough friction to hold it in place. The box should slide on until the front of the lens (the filter threads, not the glass) fit flush against the solar foil. Note: don’t push too hard – the solar foil can tear.
To travel with this filter, I am going to cut the tape on the sides so that the whole thing lays flat again. This will fit nicely in my computer bag… Some extra gaffer tape will go in my camera bag and I can put the whole thing back together when I get to my shooting location.
Troubleshooting
Given the simplicity of the build, there will only be one of two possible complications: the box is too big to be held in place by friction, or too small to fit over the end of your lens/hood.
If the box is too big: Depending on how loose the box fits on your lens, a few layers of tape inside the edges of the box should fill the gap. If the gap is larger, try taping in a scrape piece of cardboard one side at a time until the fit is snug. As I mentioned above, this is a result of taping the box together with the tabs on the inside of the sides. A few cardboard shims taped between the flaps inside the box tightened things right up
If the box is too small: If it is only a little too small, try bowing the sides of the box to fit over end of the lens. As long as you can get it on and off the lens without shaking the whole thing too badly, you should be good to go. If the box is way too small, a second attempt with another piece of cardboard is probably in order.
I hope this helped some of you out that are having trouble getting, or unwilling to pay the price for a manufactured solar filter. Let us know what you think in the comments below. If you could improve the design, how so?
Coincidentally, the book I was using to keep things square was “Photography Like a Thief” by Glyn Dewis. If you don’t already have a copy, consider getting one here. Glyn walks you through several different portraits from the lighting to the post processing. This book really is work the read and makes a great reference.