Lumoid is a band of creatives, photographers, and tech lovers offering a try before you buy service for the latest in technology from photography gear and drones to fitness trackers and audio equipment. They make it convenient and affordable to test drive the latest gadgets before committing to buy them. Lumoid is also a rental house for the best and latest in photography. This post appears in The Lumoid blog, and is reposted here with their permission.
Photoshop can be a daunting platform to master, especially for the uninitiated. Still, photo editors and photographers have a wealth of potential and capability at their disposal thanks to Adobe’s photo editing dream machine. While experts can create wildly artistic creations in Photoshop from their bare bones photos, the platform excels at easy, quick and seamless editing and retouching tricks. Most of these aren’t elaborate in nature or execution, but can still go a long way from taking your photo from ordinary to extraordinary. Below are four of the easiest and most effective retouching tricks that anyone can pull off in Photoshop.
Using Healing & Clone Tools on a Separate Layer:

This one is as easy it comes. Check off the box that says “Sample All Layers” in the Options bar in order to heal spots in a separate layer. Done!
Restoring Blown Out Highlights & Shadows:
 1. Brighten your image as much as you like using the Brightness/Contrast adjustment tool, paying no mind to any overexposed areas.
2. Then, right click on the layer you’re editing and click “Blending Options.” A menu titled “Layer Style” will appear.
3. At the bottom of this menu is a color bar titled “Underlying Layer.” Hold down the Alt or Option key and drag the white input slider bar to the left to make the highlights in your image reappear. Conversely, drag the black input slider bar to the right to recover shadows.
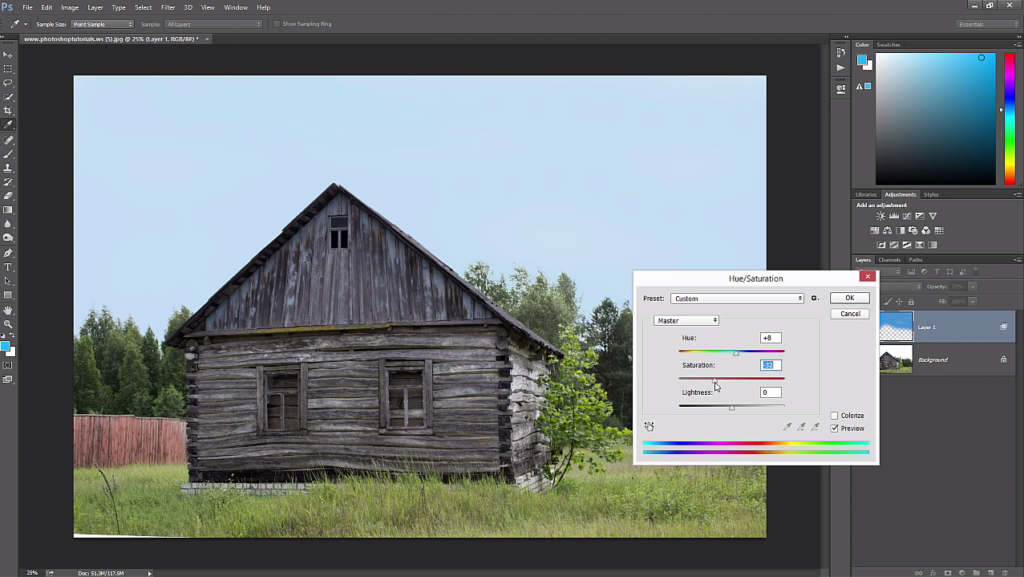
Painting in a Blue Sky:
 1. Create a new layer to the image you want to edit, then select the Brush tool and pick your desired blue color.
2. Use a soft round brush for the best results. Then, paint over the sky using the brush and color you’ve selected.
3. Right click on this layer and select “Blending Options.” Drag the black input slider in the “Underlying Layer” bar to the right. Then, hold the Alt or Option key and drag the right half of the slider all the way to the right to soften your blend.
4. Lower your opacity to around 50% to make your blue sky look as realistic as possible. Then press Ctrl + Q to open the Hue/Saturation tool, and play around with these to get your desired blue colored sky.
Reducing Haze:
 1. Navigate to the Adjustments panel and create a new Levels Adjustment layer.
2. Apply the Blue Channel to your layer mask by clicking “Image” followed by “Apply Image” and selecting “Blue” in the “Channels” drop-down menu. Hit “OK” when done.
3. Go back to the Levels Adjustment layer and click on the Properties panel. Drag the white and black input slider towards the middle to add contrast. The middle slider bar will add brightness.
4. If the colors appear too bright after doing the previous step, simply change the Blending Mode to “Luminosity” to restore the original colors. Voila – no more haze!
Create beautiful images of your own when you rent The Weekender or The Wayfarer with Lumoid.
If you have any questions or other tips to share, let us know in the comments below!
You Might Also Like These Articles:
- The Best Photo Editing Software For Photographers in 2020
- Back to Basics: A Long Exposure Photo and Processing Tutorial for Beginners
- Meet Photolemur: Artificial intelligence that automates your post-processing
- 23 Landscape Photography Tips From A Pro
Leave a reply