
For a long time as a photographer, I did not have access to a studio nor did I have the necessary lights to help create a studio setup indoors. And let’s not talk about renting studios! So, in absence of a studio, I came up with one easy way to create the studio feel, which you will find is pretty cheap.
Starting out, I would always look for an excuse to use natural light, but I changed my mind over time. It really was just me being too stubborn to admit that I was simply not comfortable using studio lights as I did not understand them. But even if I wanted to use a studio, the costs of building one and buying all the equipment necessary to run it are huge (as I am learning right now). Renting a studio is another option, but it can be expensive if you are on a tight budget or just want to experiment. My solution to that was an outdoor studio. Now, while you may be thinking of an outdoor studio with lots of fancy lights setups, let me stop you right there. I chose natural light.
Here are the things you will need:
- Backdrop stands
- Backdrops or seamless fabric
- Scrim (and its stands possibly)
- Reflectors
- Clamps or clips

That day I learned just how essential clamps were to hold a backdrop in place when there is wind.
When it comes to backdrops, you can find good ones like the Savage seamless background paper or the muslin reversible background online for a good price. But for those who want to experiment on a whim without investing too much, consider the cheap alternative that is fabrics. At the start, I did consider buying backdrops in store, but it turns out they were not so cheap in Mauritius where I live and the ones that were in store were particularly ugly. So, I went to a fabric store where I found some amazing suede-like fabric or velour as it is also called. It is available in an array of gorgeous colors from grey to pink. I bought some five meters of blue, green, coral, grey, and black fabric, all for $125 roughly. I even got the shop owner to stitch across one end of each fabric so that I could insert my bar and have the fabric hang without any trouble. Now, you can get any other fabric, but do choose one that does not reflect light too much and that’s not easily wrinkled. In my case, I chose suede because it comes in great colors but also because I was looking for the creased look. I did not want something clean and plain. I washed them once in a machine, and I got the look I wanted. And last, to hold the fabric in place on my stands, I bought some clamps to use along with the backdrop clips I already owned.

Using your stands in your composition can also work to great effect.

When setting up for an outdoor studio, I would strongly recommend you find a place where there are no high buildings around to project shadows or where windows around won’t reflect strong lights during the time you are shooting. Find a spot with little wind where the sun will shine all around. If you want to achieve a sharp and dramatic look with the harsh sunlight, it's best to place your backdrop and stands in a spot where the sun is shining on the left or right side. The shadows can always be softened a bit with a reflector or diffuser, and the direct sunlight can be diffused with a scrim placed above. If you got the stands for the scrim, then you can likely carry out a shoot with little or no help at all.

Setting up the studio in a garage with a wide open door can yield great results. A scrim used on top of the model will give you an especially softer light, but certainly not a plain one.
But if you don't have an assistant to help you out and you feel you badly need some help, there is something else you can do. I am very often on my own for my personal projects, and I usually like to have the sun behind my backdrop so that I can use a reflector or diffuser right in front of my subject. Depending on what you prefer when you are working alone, set your studio on a terrace, in front of your house, or even at the entrance of your garage, where the light source is either on top of your head, or slightly behind your backdrop. If the ground is of light color, it can reflect nicely. With the sun shining on top, you can light up your model in different ways: you can simply put a reflector or a diffusion panel flat on the ground in front of your model or even add another one slightly tilted at an angle on the side of your model. What I like with this setup is I can easily get a rim light in my model’s hair. There are many possibilities you can experiment with and come up with on your own.

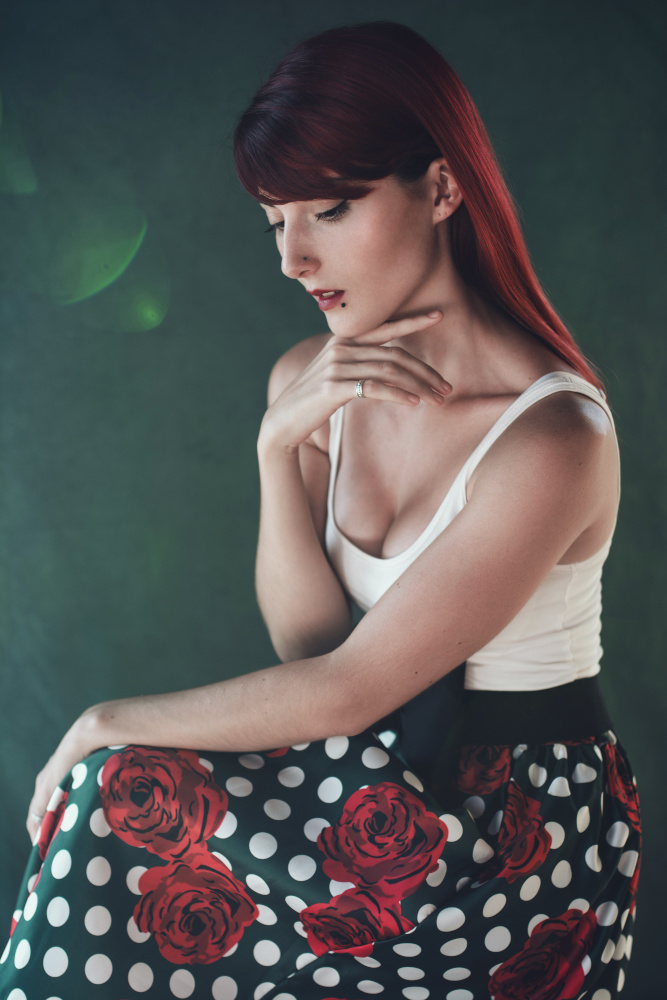
The backdrop was simply set up on a porch with sunlight streaming from the left side. No reflectors or diffusers used here.

The sun was behind the backdrop here, and I placed a reflector flat on the ground to light the face and hair of the model.
However, shooting outdoors or with only natural light comes with a few disadvantages. You will have no control over the weather. Even if the forecast for the shooting day was a sunny one, you might still have overcast weather, and if you were looking for harsh sunlight for a dramatic look, you will be stuck with a softer look. It could also rain or it could be extremely windy. In the last scenario, one thing you can do is use sandbags to keep your stands from crashing on the ground. But for the rain, there is nothing much that you can do, and if you are using fabric, you can bet the rain will soak it in no time. So, choose your shooting day wisely.
I’ve been using the same setup and suede backdrops for my personal projects for a couple of years now, and while I have grasped how to use them effectively, I am still surprised sometimes by how an outdoor studio can help me learn more about natural light itself and how some "flaws" can be appealing like in the image below:

All in all, buying the fabrics for a backdrop did not cost me much, and while I already owned the stands, I am sure you can find some decent ones for a good price. The results from an outdoor studio shoot can be pretty rad if you take time to understand your light and manage it. It also shows that you can do so much on your own without bearing the costs of a renting a studio. Feel free to share your own results if you’ve experimented with an outdoor studio before.


Khatleen, what a excellent example of hard work and honest, beautiful craftsmanship.
Thank you very much!
This is a terrible article. Would it had killed you to include photos of lighting and how you used the clamps instead of just your vanity shots of the final images? Probably not, and that would have made this a good article. There's no "setting up" here, it's just vanity shots of your edited images. Bravo, I learned absolutely nothing but here's a gold star.
Frank ,
No need to be ugly about it. Why not just ask her to include photos of the setup ? It's free content and so if it's not perfect you don't lose much .
A polite person with a critique is always appreciated !
To my honest opinion there is a lot of useful information in the article.
I, being mostly a lonely shooter, totally understand the absence of bts. I do agree that the bts shots would have been a great addition, but when you work alone and have to manage all, in the end you take your shot, and there is no one else around to take a bts of the setup. I didn't care to take bts shoots until last year, where I started publishing articles, and Khatleen, being a new writer here, is in the same ship I believe.
So Khatleen, thank you for the very detailed article, I indeed enjoyed it and it somehow reminded me of Peter Lindbergh setup. Please don't forget to take bts of your upcoming shoots, or if there is non, you might use diagrams to build 1-2 for the articles.
Thank you! I'll certainly use diagrams next time! Great idea!
actually this is a DIY article, not a BTS
haters be haters, lovers be lovers...
Seriously @Frank Delapin should you have wanted to be nastier i don't think you could have. Frustrated for not having the setups ? trying to figure it out is an option.
She provides information on the fact of the type of fabric she likes to use, and why those choices, the elements used albeit not showing setups (setups are useless for 99% of shots to be honest, as you don't have the exact power, distance, angle, position, and whatever else might be needed, and even if we follow a setup, we won't get the same result... it's called personal style).
Yes BTS can be nice, and if it's not there... she is taking time to write a nice article on something she does... if you don't like it, just pass no ? or maybe start writing ...
You are quite right. Setups are different for each photographer, depending on the look they want to achieve. Mine are actually so simple with a simple backdrop, and just one or two reflectors. Some people even wonder why I just shoot with so little, but those I've worked with always liked the results.
Minimal setup is great, and it's nice to see. You did great, welcome to Fstoppers team and thanks for your time writing articles and sharing.
Merci infinimment Olivier !
Yo. Go play in traffic. We don't need that kind of negativity around here.
Hi Frank,
I appreciate your point and while I do not appreciate or understand your negativity and quite rude attitude, I should say this: If you've taken time to read the article, you will see that I've explained my setup quite clearly. It's easy to figure out. The tips are there.
Now about the lack of BTS photos, you must have overlooked the fact that I said those photos are part of a personal project where I was on my own. On other shoots, my assistant usually takes photos. But on those shoots from the article, no assistant.
Upon writing the article, I myself wish that I had BTS photos of those shoots. I'm sure that like you, they would have appreciated it. It would indeed have been a great addition in helping readers to see exactly what I do. But before starting to write for Fstoppers, I never really took time to shoot BTS because I came to get my shots, and that's what I would do.
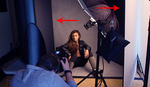
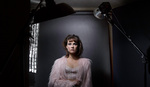
But hey, in case you still need to see a BTS shot of my setup, here is one from a shoot I did 3 years ago and l got you to thank because my assistant read your comment and was kind enough as to go dig those two shots to send them my way for you). I was not using the suede fabrics I mentioned in the article, but some other kind.
I hope that helps !
No one will give you everything pre chewed and pre digested.
this whole article was about using minimal gear and experimenting with natural outdoor light which are situatiion we don't always go for.
Everything doesn't need to be a DIY...
You can look at the catch lights in the eyes and see studio details. That will tell you what kind of lighting is being used.
I enjoyed this article. Sometimes my portrait photography setup in Austin Texas is more sparse than yours.
-Chris "AoxoA" Hooper
https://aoxoa.co/austin-tx-portrait-photographer-headshot-photography/
Hey Chris!
I took a look at your photos. Thanks a lot for sharing!
I know you did not ask for it, but allow me one recommendation though: I am not sure what lenses you use, but if you got a 50 or 85, you can get perhaps use them at a wider aperture for better shallow depth of field, instead of blurring it later in post-processing. I'm sure it would save you some precious time. You seem to have got quite a large backdrop compared to me, I'm pretty sure you can position your subjects further away from the backdrop to get even better shallow depth of field. The good thing about being in an open space in an outdoor studio, is that we got tons of space to move around.
Yes, I know. Still, thank you for the recommendation. It is very good advice ;-)
-Chris "AoxoA" Hooper
The last photo ... they are two different photos ? or ? bad example of before and after ..... Or you are a great retoucher ?
But the before i like more .
Hi Robert, I included it as a before and after to show the "flaw" I got in one picture. I was using the 35mm 1.4 Sigma Art and I had just started using it. I noticed during that shoot how sometimes I would get some flares. I thought it was odd but appealing sometimes. It was all because my backdrop was setup near a pool with light streaming from both sides, and the sun was behind the backdrop, you can see how it was easy to get a lens flare on such a picture. The before and after shows how a different position from me and can yield surprising results - I was not looking for a lens flare, but I got it when doing an outdoor studio setup. It was simply unexpected and I included it to illustrate that precisely.
Here is another one.
( I did like it too! I never got lens flares like that on Photoshop! :P )
Nice info you provided dear Khatleen and in fact the negative guy just made us read your article fully, at least me. I was looking for outdoor backgrounds for sometime and you happen to pop up in front of me. Thank you a lot and this kind of diy articles in my opinion as others mentioned doesn't require bts. Have a great day and welcome to Fstoppers my dear
I'm glad I could help !
Well, i certainly learned something from the article. Thank you, Khatleen.
I'm happy you did ! Thanks for reading !
I can see how she sets up her studio by looking at the photos, it's not that hard to do, I loved reading this article.