
HDR Photography
Thankfully, HDR photography has come a very long way since the term was first coined in the early days of DSLRs. Back then, the dynamic range of a digital sensor was almost as limited as the dynamic range of slide film, and in many cases even LESS dynamic than negative films! (Don’t believe me? Just remember that even in the 1940’s, Ansel Adams could capture both sunlit snow and deep shade on a single piece of B&W film.)
Also thankfully, the psychedelic, over-processed HDR fad has passed, for the most part. Don’t get me wrong; I still appreciate it as an art from, when it’s done well, and that’s what I’m hoping to show you how to do here.

To learn the basics of HDR photography, be sure to check out our HDR Photography Workshop!
How To Create Natural HDR Images Using Blend-If
Today, digital camera sensors have made incredible progress in capturing high-contrast scenes. Most of the latest cameras –even the sensors with ‘poor’ performance– have dynamic range that easily surpasses 10 stops. The champions of the bunch, the current-generation full-frame (and medium format) sensors, are about to pass the 15 EV mark!
This has significantly reduced the need for 5-shot or 7-shot bracketing sequences, or special HDR software for controlling the resulting huge tonal range. – Again, don’t misunderstand; HDR software is still very useful for those folks who are really into a certain style. Also keep in mind that special HDR software can be useful for achieving certain “looks” even on single exposures!)

However, even with dynamic range passing the 14 EV mark on quite a few of the latest cameras, there are still plenty of opportunities in which bracketing at least two shots might be a good idea. It will help you get slightly better image quality out of your highlights and shadows, even if a single exposure could have sufficed. Otherwise, in a single exposure you run the risk of excessive shadow noise, or posterized / clipped highlights.
The most effective way to quickly blend two exposures for optimal highlights and shadows is to use the ‘Blend-If’ tools for Photoshop layers.
Step 1: Capture Images that preserve highlights and preserve shadows
Start by capturing your bracketed raw images like you normally would. I tend to go straight to capturing two single exposures, one with perfect highlight preservation and one with sufficient shadow detail, however capturing 3, 5, 7, or even 9 images with auto-bracketing is still a good workflow, even if you only keep two of the resulting images.


Either way, simply make sure that you’re capturing the full dynamic range of the scene.
Keep in mind, the older your camera is the more this 2-image technique may not be possible. Unfortunately, some of the older Canon DSLR sensors, even the full-frame bodies, simply do not have enough dynamic range to capture some scenes smoothly in just 2 exposures; you may need 3 or 5 exposures.
For those Canon shooters who are curious, the two current (non-flagships) Canon sensors with the best dynamic range are the 5D mk4, and the “classic” 6D. Also the APS-C 80D, M6, and 200D (SL2) have decent dynamic range.
Step 2: Process images to appear as identical as possible
The long-standing, traditional workflow of HDR photography has been to simply process each frame neutrally, at varying exposures, and then use all 3-9 of the exposures to create the final HDR file.
This is still a viable course of action, however, the Blend-If technique is a simple alternative that goes an alternate route: choose the best two files, and process them so that they look as identical as possible, including their overall exposure.

The shadows of one file might be a bit grainy, and the highlights of the other file might be a little bit clipped, but as long as the overall tones in the two images match perfectly, that’s is all that matters. You’ll use Blend-If to “magically” (at least, almost effortlessly) combine the preserved highlights with the noise-free shadows & mid-tones.
Step 3: Layer in Photoshop and Auto-Align if necessary
After processing the raw images in Camera Raw, (Adobe Bridge, or Adobe Lightroom) the next step is to open each layer in Photoshop. Actually since the critical tool is in Photoshop itself, you’re welcome to process the images in your alternate raw editing software of choice, such as Capture One Pro, or Affinity Photo.
*Be sure to open them as Smart Objects (ACR users only) if you would like to be able to continue accessing the raw adjustments during or after the blending process. Otherwise, (and especially if you need to auto-align the layers because you bumped your tripod in between shots) …just open the images as ordinary layers.

Next, layer one image on top of the other. Usually, the top layer is the one that was originally over-exposed. (The one with clean shadows, but clipped highlights)
Step 4: Use Blend-If to combine highlights and shadows of each layer
Right-click the top layer, and open the Blending Options dialog box.

In the “Blend-If” box, grab the white point slider for the upper layer, and drag it down down to a point where highlights are preserved to your taste. Don’t worry if you can see an abrupt, hard edge between the two layers; we’ll be addressing that next!
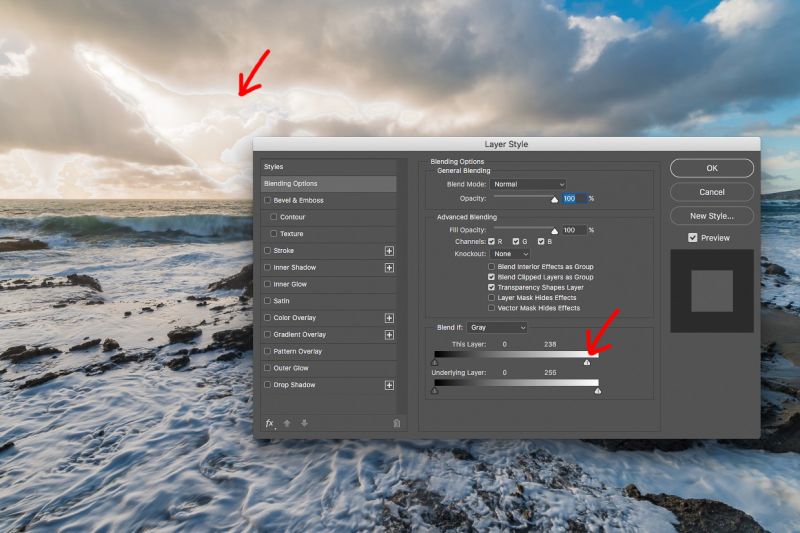
Hold down the Alt or Option key, and click on the same slider again, dragging it further to the left (towards the shadows). This splits the slider in two, and allows you to create a gradual transition between the two layers.

While holding down Alt/Option, continue dragging this slider until that abrupt transition vanishes and the tones of the two layers blend smoothly and naturally.
As needed, fine-tune the sliders until you are satisfied with the transition. Zoom in to 100% if necessary.

If you’re really lucky, that’s all there is to it! However, it is highly likely that other areas of your over-exposed image, which have bright highlights, may have also attempted to blend with the darker layer below, resulting in some very weird artifacts.

Step 5: Hide any erroneous areas with a simple layer mask
Therefore, as a final step, I like to duplicate the bright layer, move it to the top layer, undo the Blend-If slider adjustments, and then use a simple layer mask with manual brushing to reveal only the one or two spots where we want our Blend-If work to be visible.
(For those who are wondering, this tricky area is where Lightroom’s own HDR feature failed- artifact ghosts appeared in the water on the rocks.)

 With this final step, you are now done! If your workflow involves a small final bump of contrast, saturation, or sharpening, then you can apply that to the resulting TIF or PSD file at this time, and then export the image for your desired display medium. (social media, video, print, etc.)

Learn HDR, Photography 101, and A-Z Workflow
If you’re curious to learn more about HDR photography, the basics of photography itself, or a complete post-production workflow, be sure to check out the SLR Lounge Workshop Store, or consider joining SLR Lounge Premium!
If you have any comments or questions, please leave a comment! Thanks for reading, and happy clicking!


Get Connected!