
Hard light used to be the bane of my existence. I hated it. Avoided it like the plague.
I preferred the beautiful light of the golden hour, or the safe shelter of open shade. They were my warm blanket. My perfect cup of tea. The softness of the light and the colors made me happy every. single. time.
But, let’s be honest here. You can’t avoid shooting in harsh light, it’s impossible. There are times when you just have to pick up your camera and shoot what’s in front of you… even if the light isn’t perfect.
Or is it?
Table to Contents
What is hard light?
Hard light is a strong bright light – think the sun with out any clouds. It usually casts a lot of deep shadows.
Embracing hard light
This past year, I found myself shooting more and more in hard light. Did I want to always do that? No. I did not. It was unavoidable though. With the birth of our son in 2016, it changed how I shoot and (even more importantly) when I shoot.
I no longer had the flexibility to go out at the perfect time each day. When we took day trips, we’d find ourselves out and about in the midday hours. Not the most ideal of times.
So, I had to learn to adapt my shooting and step out of my comfort zone.
And because I am a total sharer, I’m going to share with you some tips that I use for shooting in light that is less than perfect.
Just for you! 7 Creative Ways to Use Outdoor Light
1. Shoot in manual and shoot raw
I’m sure most of you do both of these already. So this is probably one of those unnecessary tips for those of you that do, but it’s worth mentioning.
If you aren’t, consider them. It’s so much easier to manipulate your images in post processing if you shoot in raw.
You can recover shadows like a dream and bring down your highlights a lot more easily than shooting in jpeg. It’s so incredibly forgiving.
And shooting in manual is just a given when you’re shooting in light that might be wonky.
Being able to choose your own settings gives you total control over your image. It just does.
If you’re not exactly sure about RAW check this blog post out- RAW vs. JPEG
2. Use spot metering for hard light
I always use spot metering and will select a spot on my subject to adjust my exposure.
When shooting in harsh light, I tend to not use ETTR (Exposing to the Right) for skin.
In situations where the light is incredibly bright, I will expose to either zero or slightly underexpose.
Don’t let all this talk about exposure overwhelm you, let me help –Complete Guide to Understanding the Exposure Triangle.
When you do this, you can bring up the exposure in post, or fiddle around with your highlights a bit more.
Also, by exposing to zero or slightly underexposing, your colors will pop…allowing you to avoid that really washed out look you can get when the light is less than ideal.
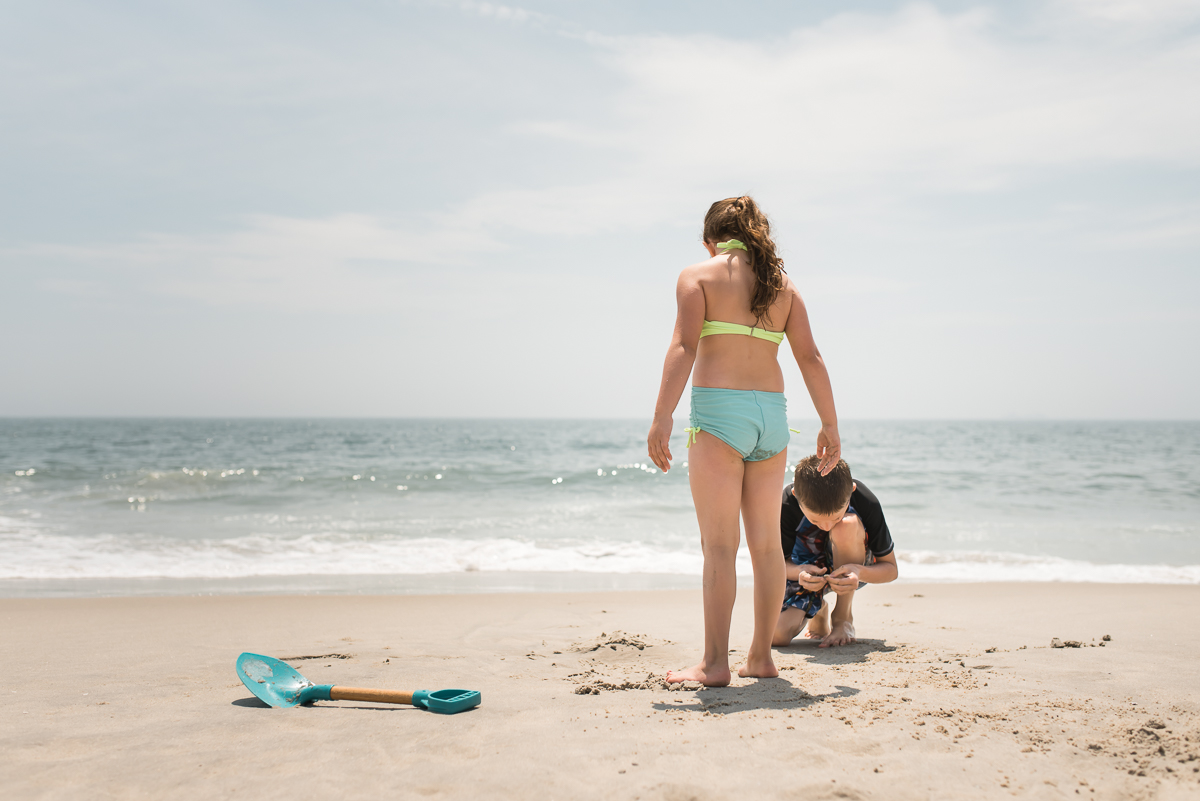
Here’s a before and after where I ever so slightly underexposed my daughter’s skin.
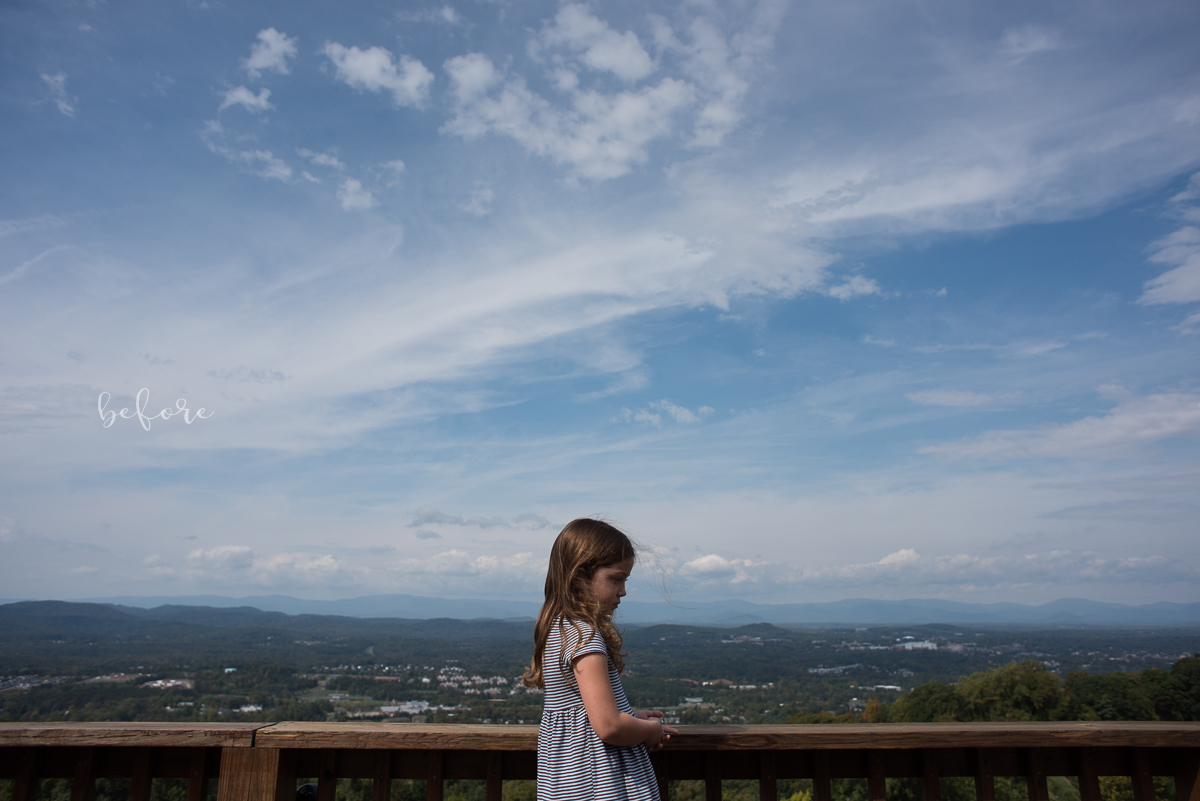
I really wanted to retain details of the really pretty sky behind her. The sun was coming from camera left.
I had her stand with her back to the light, otherwise I would have had some really crazy shadows going on (more on that next tip!).
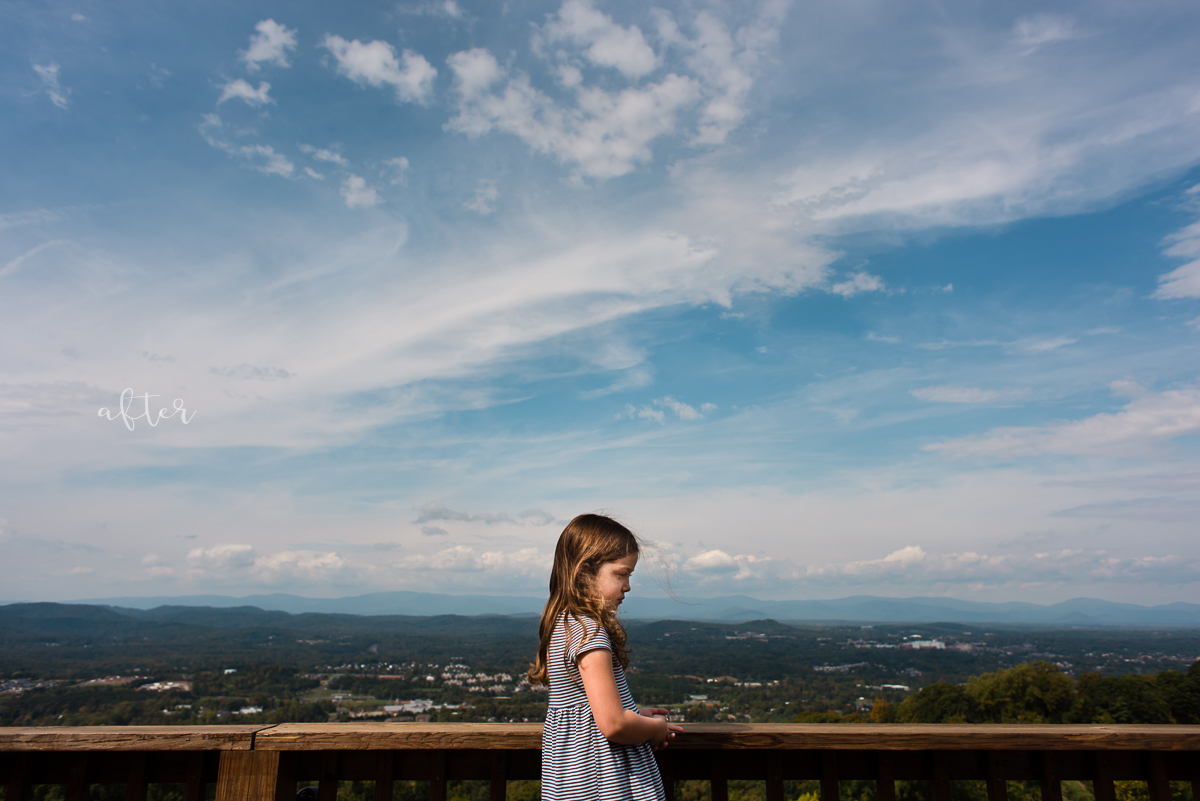
I also adjusted my aperture to 5.0, which was enough to get the detail in the clouds. She’s just underexposed a wee bit, but see how no details were lost in the sky? All I had to do then is pull up the shadows and exposure a bit where I wanted.
I left a little shadowing on the part of her face where you would see some shadows because I felt it fit the feel of the image. Then I just edited it to my taste.
Read more: Zone System: The Basics
3. Watch for shadows in hard light
Be sure to consider where your subject is in regards to where the shadows are falling when shooting in harsh light.
If they’re facing the light, depending on where that light is coming from, you might have unflattering shadows.
It’s easy in group photos to have unwanted shadows on faces especially if you have a large group.
Think really dark, under-eye circles. Not good. I handle this in a few different ways.
See 7 Natural Light Photography Mistakes that will Ruin Your Photos
One way, you’ve already seen in the before and after for the previous tip. By shooting her profile, I eliminated the crazy shadows that otherwise would have been too harsh for the shot.
My goal was softer light and shadows to go with the feel of the image.
Another way is to position my subject so the light is behind them. I still have to watch the light and make sure that it’s not over exposed though! Here’s a post all about backlighting!
Sometimes, you might still have a little bit of bright highlights, but as long as they aren’t too much of a distraction or completely take away from your image, I don’t find anything wrong with that.
Also, unless you have a reflector, your subject’s face will be shadowed.
Don’t forget though, that’s something that can easily be remedied in post processing!
4. Shoot from above in hard light
In the shot of my daughter in the pool, for example, I stood above her and shot down. This is so when she turned her face up to me, the sun would be shining directly on her face.
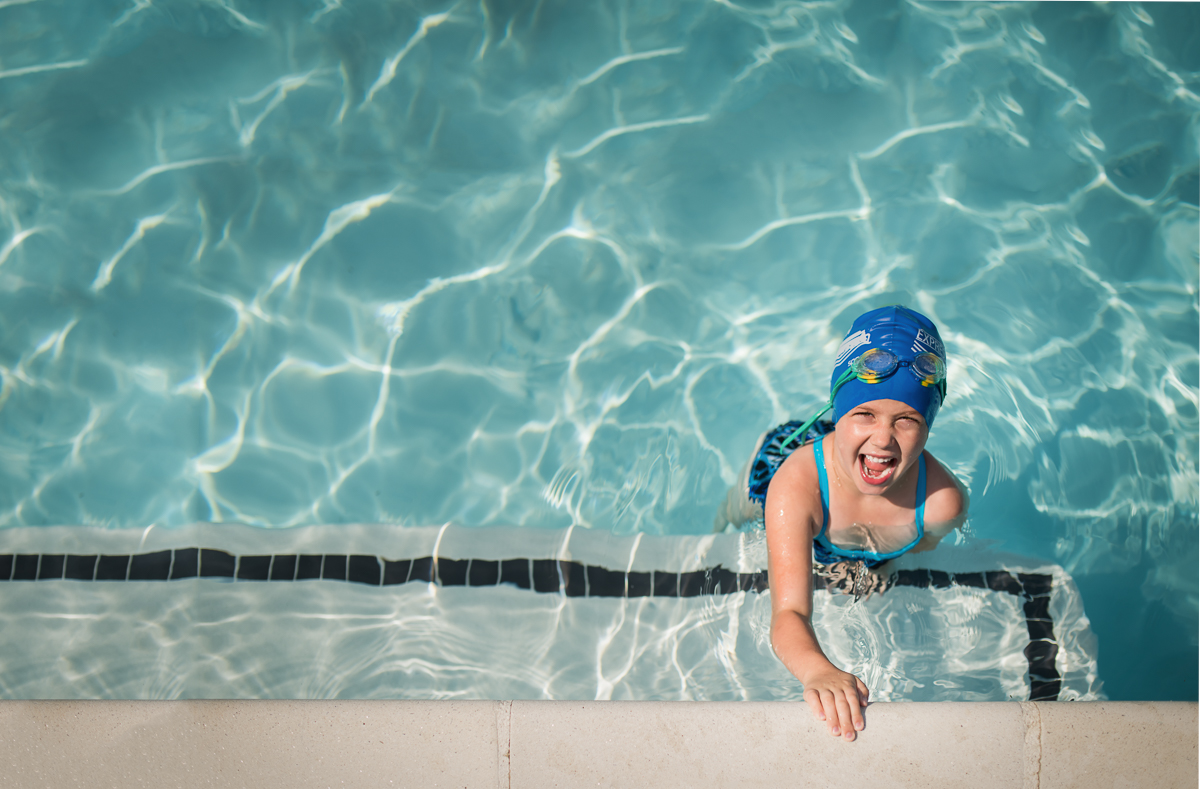
Now, it’s worth noting that when you do this the sun is coming from overhead and it’s going to be bright.
So she wouldn’t be staring into the sun, I had her close her eyes, then told her to open them when I said so.
That helped to minimize the squinting, as well as the brightness of the sun in her eyes… allowing me to capture the beautiful light on her face.
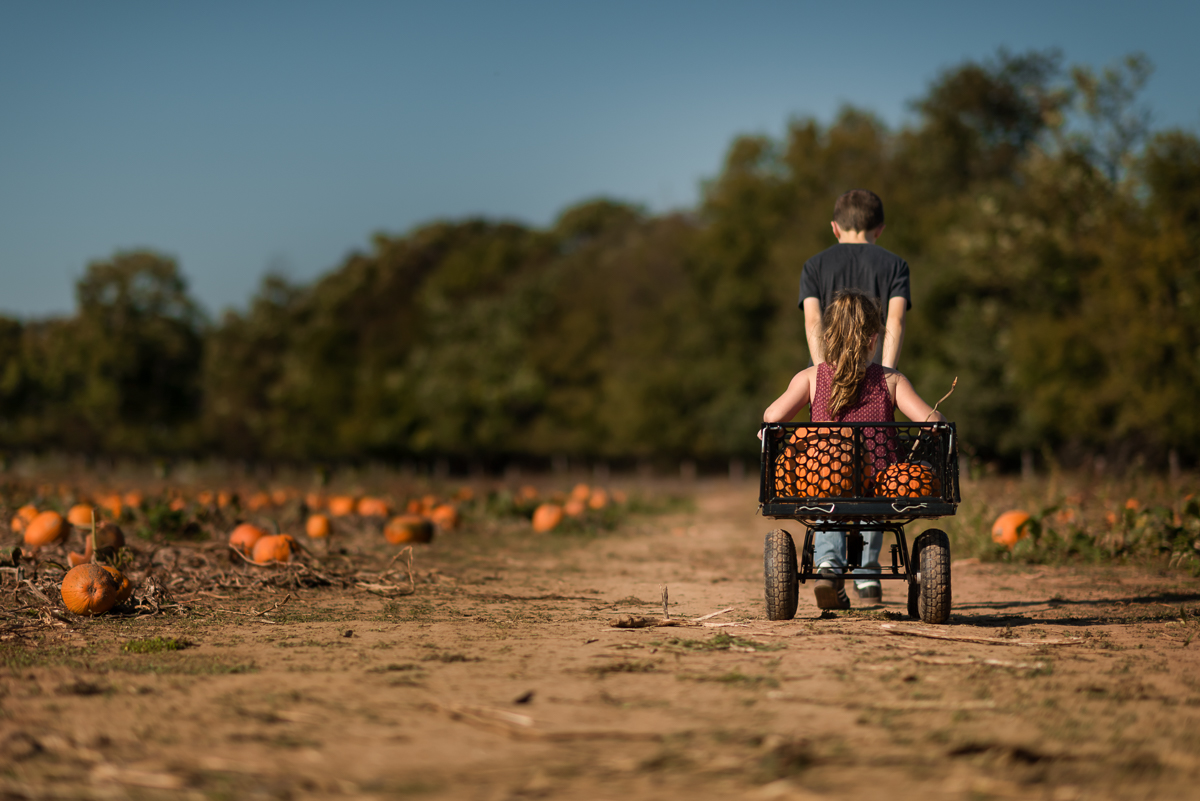
5. Capture a faceless portrait
One last thing you can do is shoot a faceless portrait. I love faceless portraits.
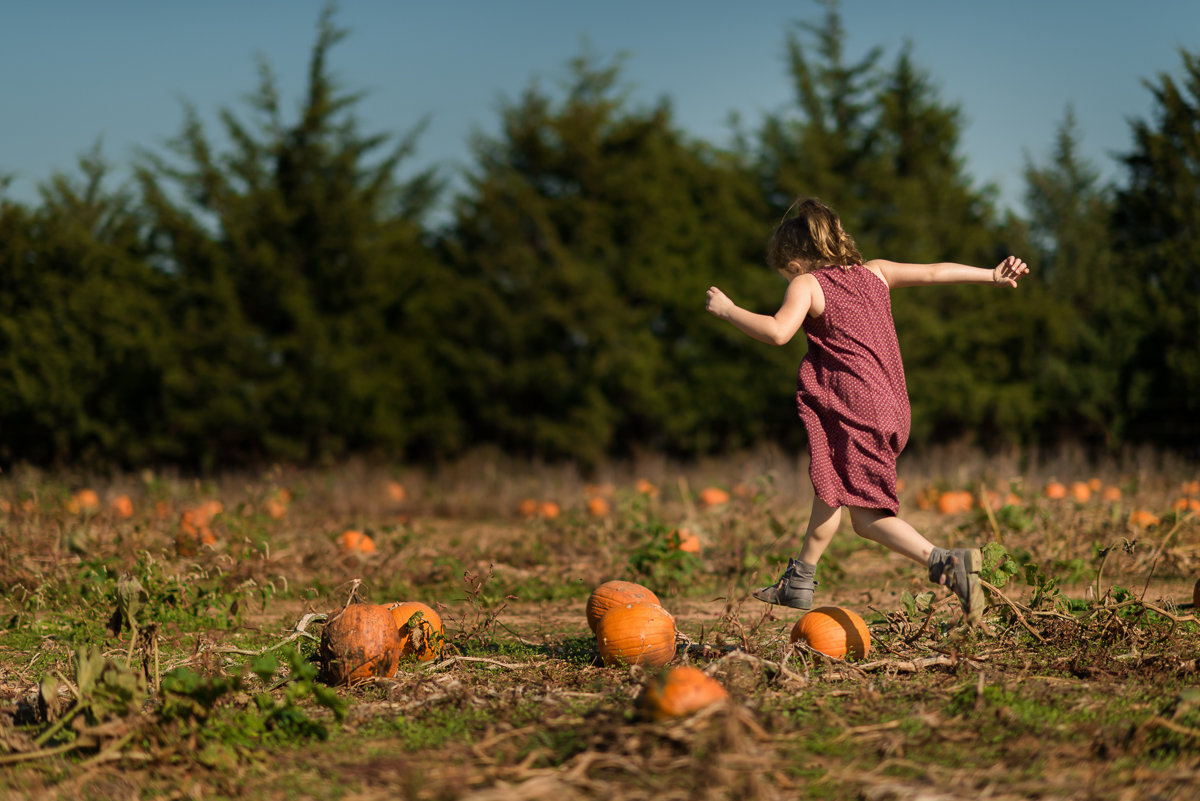
All I’ll do is give my kids an activity to do, whatever it may be, and have their back facing me. Jumping, digging, pulling their sibling in a wagon… whatever they want to do.
It’s easy for them because it involves them not having to pose. It can tell a great story about the day, and it also helps to create no weird shadows. Just beautiful light!
6. Dial in white balance in hard light
Moving away from Auto White Balance can also help when shooting in harsh light.
I always use Kelvin when I’m shooting because I like to have control over all of my settings.
Being able to set your own white balance helps in situations where you have really bright sunlight.
When setting it for outdoors, I tend to go a touch on the warmer side, just because it’s what I prefer. It also adds a richness to my images that I love.
See here How to use Kelvin for White Balance
FAQs
Follow a few easy steps to create beautiful hard light photos. First raise your aperture, lower you ISO, spot meter off of your subject, and position the shadows where you want them to fall.
F stop will determine how much light comes into your photo. Decide how much you want in focus and then set your aperture. Make sure your ISO is low and you can also bump up your SS if you need to.
Another thing to keep in mind is maybe stopping your F/ down to be able to retain the details in the sky if that is part of your photo. A sky can easily get blown out in harsh light.
Position your subject out of the shadow. You might also need to have your subject close their eyes and only open when you take the shot. Lastly, try shooting from above!
Well, that’s it! These are just a few things you can do to get started shooting in the harshest of light.
For me, it was a lot of trial and error, so don’t be discouraged if your first attempts aren’t what you want them to be.
See what works. See what doesn’t work… but, most of all, have fun! You’ll be surprised what can happen when you step out of your comfort zone!
Read more about hard and dramatic light:
– The Magic of Light and Shadows
– How to Tell if your Highlights are Blown (and how to fix them)


I have just recently started shouting in harsh light as well and was surprised at how much I like it! These are great tips! ❤️
A good article, but what is HARD LIGHT, when, where and how to encounter one? OK I am 69, a pretty good Amateur Photographer so maybe I know. But hundreds of young people and the novice may not. Can HARD LIGHT be made artificially as in the studio or the home. Hard light as the one found on a bright sunny day say on the beach or an icefield or an open market is challenging, but I love it. The high contrast, hard edges, lots of texture and detail, the peppy photo is just amazing. I can use the shadows falling on the ground or a wall to impact the photo. Yes, do not over expose – be on the darker side – and the color will pop on post processing with deeper richer colors.
Great list of tips with example! Question, how did you select your white balance for the pool shot? Every time I try to take pictures of my family in the pool with my DSLR, I get very blue pictures. Thanks!
I recently had to shoot an outdoor wedding. This was last minute and and not a shady spot in sight. With creative positioning and under exposing some imqges, I was able to handle the job. I will say, I was REALLY nervous about a 2pm wedding! This article is awesome! The tips are fantastic!.
Thanks for these tips! I’m curious, can you set Kelvin on a Canon Rebel T series? Or is that only an option on a full-frame, such as the 5D Mark series? I’m guessing that is the case, because I can’t find that setting adjustment anywhere on my Rebel. Thanks!
Great post, being an older photographer and being an amateur when it comes to digital photography ( I learnt on film photography in the 80s), I find your post very informative and encouraging. I am not afraid to shoot in hard light and using different lenses, but sometimes everything goes haywire, and it is good to redial and see where I went wrong. Keep up the good work.